Kubernetes has become the go-to platform for deploying and managing containerized applications, and mastering its storage and security aspects is crucial for any DevOps professional. This guide provides an in-depth look at Persistent Volumes (PVs), Persistent Volume Claims (PVCs), Storage Classes, StatefulSets, Role-Based Access Control (RBAC), Secrets, Network Policies, and Transport Layer Security (TLS).
Persistent Volumes (PVs) and Persistent Volume Claims (PVCs)
Persistent Volumes (PVs)
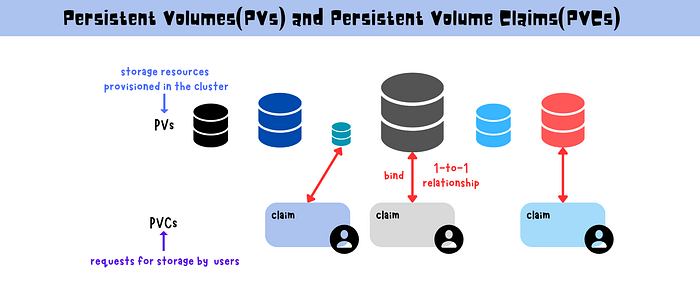
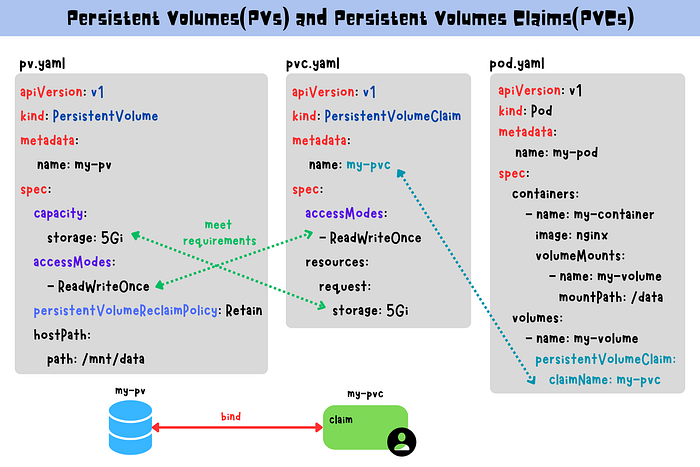
Persistent Volumes (PVs) are storage units in a Kubernetes cluster that exist independently of any Pod. PVs can be provisioned manually or dynamically using Storage Classes and can utilize different storage backends like NFS, iSCSI, or cloud provider solutions.
Creating a Persistent Volume:
apiVersion: v1
kind: PersistentVolume
metadata:
  name: my-pv
spec:
  capacity:
    storage: 5Gi
  accessModes:
    - ReadWriteOnce
  nfs:
    path: /exported/path
    server: nfs-server.example.com
Apply the configuration with:
kubectl apply -f pv.yml
This creates a PV backed by an NFS server, with 5Gi of storage accessible by a single node.
Persistent Volume Claims (PVCs)
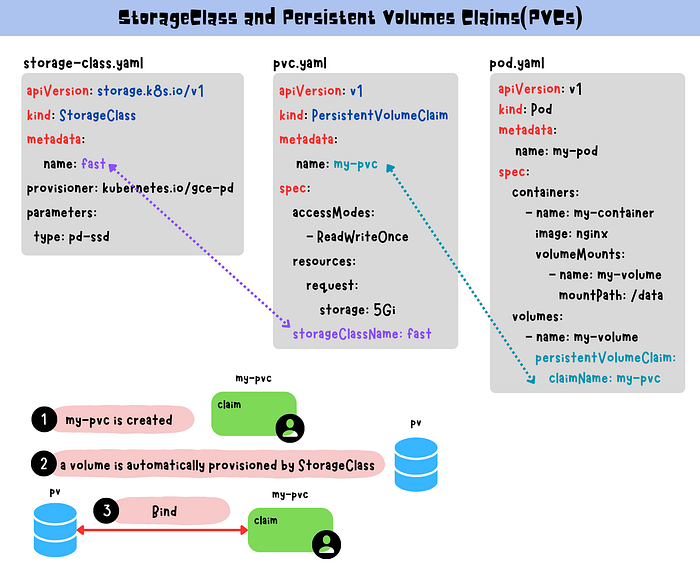
PVCs are how users request storage in Kubernetes. A PVC will bind to a matching PV based on the size and access mode requested.
Creating a Persistent Volume Claim:
apiVersion: v1
kind: PersistentVolumeClaim
metadata:
  name: my-pvc
spec:
  accessModes:
    - ReadWriteOnce
  resources:
    requests:
      storage: 5Gi
Apply with:
kubectl apply -f pvc.yml
Using PVCs in Pods:
apiVersion: v1
kind: Pod
metadata:
  name: my-pod
spec:
  containers:
    - name: my-container
      image: nginx
      volumeMounts:
        - mountPath: "/usr/share/nginx/html"
          name: my-storage
  volumes:
    - name: my-storage
      persistentVolumeClaim:
        claimName: my-pvc
Deploy the Pod with:
kubectl apply -f pod.yml
This configuration mounts the PVC at /usr/share/nginx/html in the NGINX container.
Short Name
$ kubectl api-resources
NAME                   SHORTNAMES APIVERSION        NAMESPACED KIND
persistentvolumeclaims pvc        v1                true       PersistentVolumeClaim
persistentvolumes      pv         v1                false      PersistentVolume
storageclasses         sc         storage.k8s.io/v1 false      StorageClass
Storage Classes
Overview
Storage Classes allow administrators to define different storage profiles, enabling dynamic PV provisioning with specific characteristics like performance and replication.
Creating a Storage Class:
apiVersion: storage.k8s.io/v1
kind: StorageClass
metadata:
  name: fast-storage
provisioner: kubernetes.io/aws-ebs
parameters:
  type: io1
  iopsPerGb: "10"
  fsType: ext4
Apply with:
kubectl apply -f storageclass.yml
Using a Storage Class with a PVC:
apiVersion: v1
kind: PersistentVolumeClaim
metadata:
  name: fast-pvc
spec:
  storageClassName: fast-storage
  accessModes:
    - ReadWriteOnce
  resources:
    requests:
      storage: 10Gi
Deploy the PVC with:
kubectl apply -f pvc-with-sc.yml
This PVC requests 10Gi of storage from the fast-storage class.
StatefulSets
Overview
StatefulSets are designed for stateful applications, ensuring stable identities for Pods, ordered deployment, and storage persistence. Each Pod in a StatefulSet has its own PVC, guaranteeing data consistency.
Deploying a StatefulSet:
apiVersion: apps/v1
kind: StatefulSet
metadata:
  name: web
spec:
  serviceName: "nginx"
  replicas: 3
  selector:
    matchLabels:
      app: nginx
  template:
    metadata:
      labels:
        app: nginx
    spec:
      containers:
      - name: nginx
        image: k8s.gcr.io/nginx-slim:0.8
        ports:
        - containerPort: 80
        volumeMounts:
        - name: www
          mountPath: /usr/share/nginx/html
  volumeClaimTemplates:
  - metadata:
      name: www
    spec:
      accessModes: ["ReadWriteOnce"]
      resources:
        requests:
          storage: 1Gi
Apply the StatefulSet with:
kubectl apply -f statefulset.yml
Each Pod will have a dedicated PVC for its data.
Role-Based Access Control (RBAC)
Node Authorization
In a Kubernetes cluster, each node runs a kubelet process that communicates with the Kubernetes API server to manage pods and containers running on that node. The kubelet process is responsible for reporting the status of the node and its containers, and for executing commands and pulling images from the container registry.
Node Authorization is a specific type of authorization mode in Kubernetes that is used to authorize API requests made by Kubelets. It is not intended for user authorization.
To be authorized by the Node authorizer, a kubelet must use a credential that identifies it as a member of the system:nodes group and has a specific username format of system:node:<nodeName>. Therefore, when a kubelet makes an API request to the Kubernetes API server, it includes this TLS certificate as part of its credentials, along with the system:node:<nodeName> username and system:nodes group. The Node authorizer verifies these credentials to ensure that the kubelet is authorized to make the requested API call.

node authorization
ABAC (Attribute-Based Access Control)
Attribute-Based Access Control (ABAC) uses attributes to determine if a user or process has access to a resource. These policies consist of rules that match attributes in a user’s request with attributes in the policy.

ABAC (Attribute-Based Access Control)
However, managing and updating ABAC policies can become complex, especially as the number of policies and attributes increase. This can lead to potential difficulties in maintaining the system over time.

ABAC drawback
RBAC (Role-Based Access Control)
Role-Based Access Control (RBAC) is a widely adopted authorization mode in Kubernetes that allows cluster administrators to create roles and bind them to users, groups, or service accounts. Roles define a set of specific permissions, while role bindings attach these roles to the appropriate entities, granting administrators precise control over resource access. When changes are required to user access, administrators can easily modify the assigned role, which is immediately reflected across all users assigned to that role. Unlike ABAC, RBAC provides a simpler and more scalable approach to managing access by allowing administrators to define specific roles and permissions for different entities.

RBAC (Role-Based Access Control)
We will dive deeper into RBAC in the next story.
Webhook
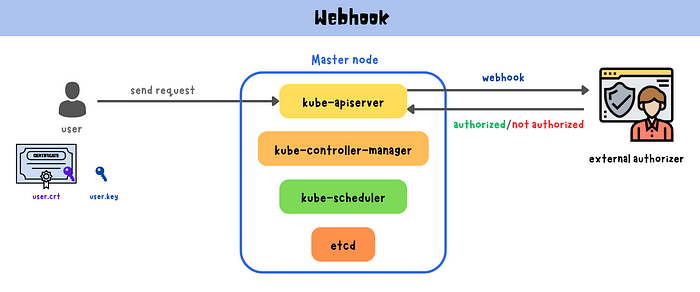
Webhook authorization mode allows for custom authorization logic by delegating the authorization decision to an external HTTP service, known as a webhook.
When a user or process sends a request to the Kubernetes API server, the server sends a webhook authorization request to the external authorizer. The authorizer evaluates the request against the defined policies and sends a callback response indicating whether the request is authorized or not. This enables Kubernetes administrators to implement complex and customized authorization rules specific to their organization’s needs using any external system for making authorization decisions, such as an LDAP or Active Directory server, a database, or custom code.
Webhook
AlwaysAllow
AlwaysAllow mode allows all requests without any further authorization checks. This mode can be useful in certain development or testing environments, where ease of access is prioritized over security. However, it is not recommended for use in production environments.
AlwaysDeny
AlwaysDeny mode denies all requests without any further authorization checks. This mode can be useful in highly secure environments where strict access control is critical, or in situations where authorization is not required at all.
Configure Authorization Modes
Edit the kube-apiserver.yaml configuration file located at /etc/kubernetes/manifests/kube-apiserver.yaml
Add the desired authorization mode to the --authorization-mode flag, separating multiple modes with commas.

configure authorization modes
For example, to enable RBAC and Webhook modes, add the following line under the kube-apiserver command:
--authorization-mode=RBAC,Webhook
3. Save the configuration file and restart the kube-apiserver process to apply the changes.
Multiple Authorization Modes
Multiple Authorization Modes allows cluster administrators to use more than one authorization mode to secure access to Kubernetes resources. When a user makes a request to the Kubernetes API server, each authorization mode is evaluated in order until one of them successfully authorizes or denies the request. If all modes fail, the request is denied.

Creating a Role:
apiVersion: rbac.authorization.k8s.io/v1
kind: Role
metadata:
  namespace: default
  name: pod-reader
rules:
- apiGroups: [""]
  resources: ["pods"]
  verbs: ["get", "watch", "list"]
Apply the Role with:
kubectl apply -f role.yml
Binding a Role to a User:
apiVersion: rbac.authorization.k8s.io/v1
kind: RoleBinding
metadata:
  name: read-pods
  namespace: default
subjects:
- kind: User
  name: ojas
  apiGroup: rbac.authorization.k8s.io
roleRef:
  kind: Role
  name: pod-reader
  apiGroup: rbac.authorization.k8s.io
Apply the RoleBinding with:
kubectl apply -f rolebinding.yml
The user ojas now has read-only access to Pods in the default namespace.
Secrets
Overview
Secrets securely store sensitive information like passwords, API tokens, and SSH keys. They can be used to inject environment variables or mount them as files in Pods.
Secret
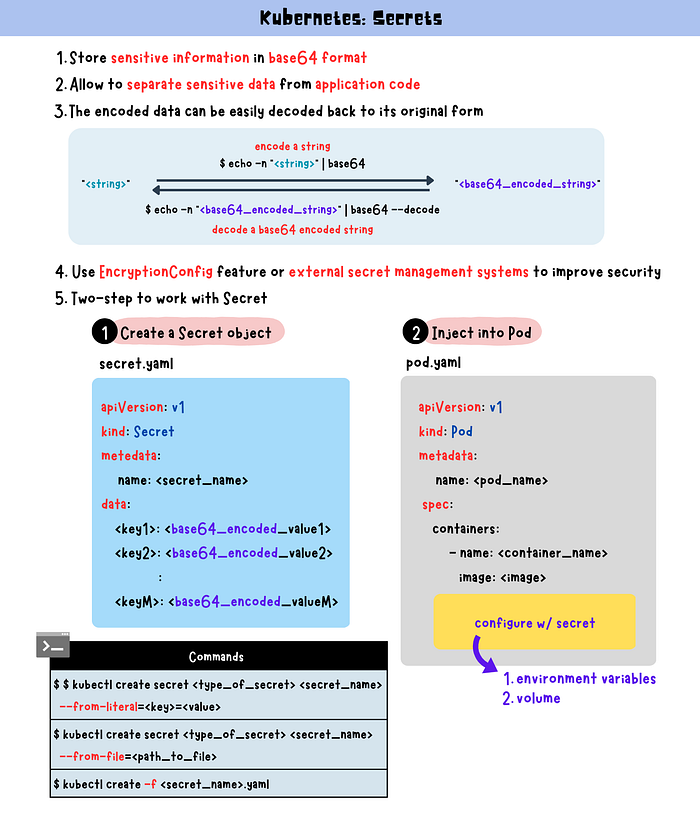
In Kubernetes, Secrets are API objects used to store sensitive information, such as passwords, tokens, and keys. They are used in a similar way to ConfigMaps but are encoded in base64 format. Secrets can be used to separate sensitive data from application code and make it easier to manage and modify the data independently of the application. Secrets can be consumed by Pods as environment variables, command-line arguments, or as configuration files in a volume.
In a restaurant, a secure pantry is like a Secret in Kubernetes that stores valuable and confidential ingredients such as truffles, saffron, and caviar. This pantry is different from general pantries because it has strict access controls and security measures to prevent unauthorized access or theft.
Secret Data is Not Encrypted
Secret data in Kubernetes is stored in base64 format, which is not an encryption mechanism. This means that the encoded data can be easily decoded back to its original form, making it unsuitable for storing highly sensitive information.
One way to improve the security of Secrets is to use encryption. Kubernetes provides the ability to encrypt Secrets at rest using a feature called EncryptionConfig. EncryptionConfig allows you to encrypt sensitive data in Kubernetes using a data encryption key. When you create a Secret, Kubernetes will automatically encrypt the data using the encryption key, and store it in etcd in an encrypted format.
Another best practice is to use external secret management systems, such as Vault or Azure Key Vault, to store and manage sensitive data.
Encode and Decode in Base64
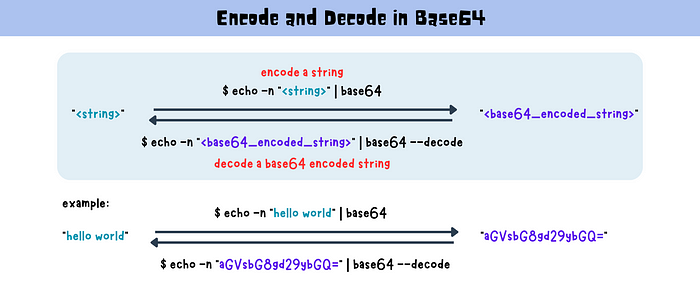
encode and decode in base64
encode a string
-n: no trailing newline
$ echo -n "<string>" | base64
example:
$ echo -n "hello world" | base64
output: aGVsbG8gd29ybGQ=
decode a base64-encoded string
$ echo -n "<base64_encoded_string>" | base64 --decode
$ echo -n "<base64_encoded_string>" | base64 -d
example:
$ echo -n "aGVsbG8gd29ybGQ=" | base64 --decode
hello world
Secret with YAML
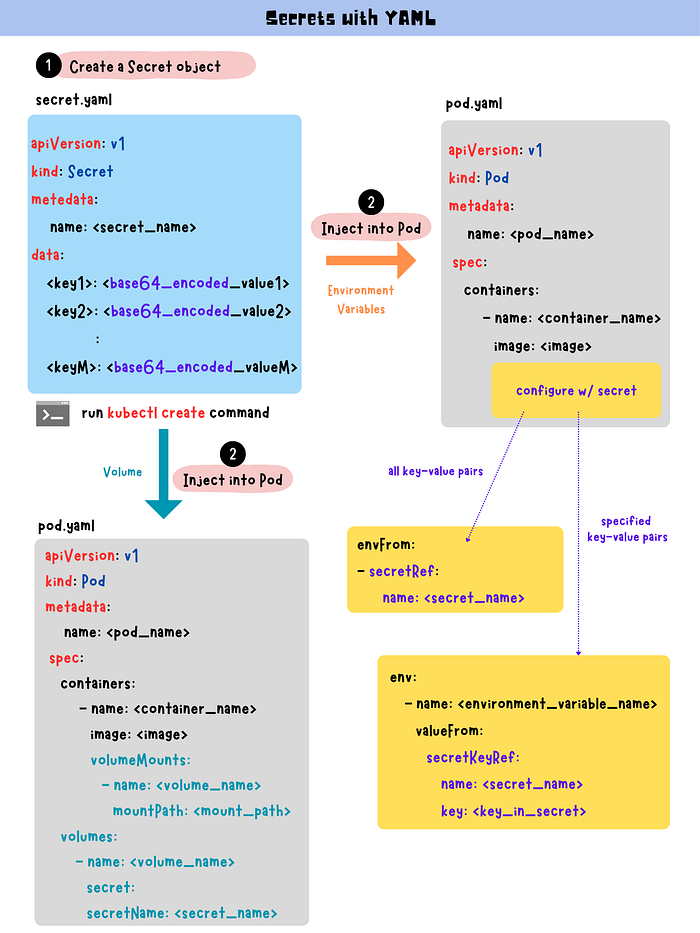
Two steps to work with Secret in Kubernetes.
Secret with YAML
1. Create a Secret Object
secret.yaml
apiVersion: v1
kind: Secret
metedata:
  name: <secret_name>
data:
  <key1>: <base64_encoded_value1>
  <key2>: <base64_encoded_value2>
        :
  <keyM>: <base64_encoded_valueM>
Run kubectl createcommand to create a new Secret object.
2. Inject Secret to Pod
2.1 Environment variables
- Configure with all key-value pairs in a Secret
pod.yaml
apiVersion: v1
kind: Pod
metadata:
  name: <pod_name>
  namespace: <namespace_name>
  labels:
    <key1>: <value1>
    <key2>: <value2>
           :
           :
    <keyN>: <valueN>
spec:
  containers:
    - name: <container_name>
      image: <image>
      envFrom:
      - secreteRef:
          name: <secret_name>
apiVersion: v1
kind: Pod
metadata:
  name: <pod_name>
  namespace: <namespace_name>
  labels:
    <key1>: <value1>
    <key2>: <value2>
           :
           :
    <keyN>: <valueN>
spec:
  containers:
    - name: <container_name>
      image: <image>
      env:
        - name: <environment_variable_name>
          valueFrom:
            secretKeyRef:
              name: <secret_name>
              key: <key_in_secret>
pod.yaml
apiVersion: v1
kind: Pod
metadata:
  name: <pod_name>
  namespace: <namespace_name>
  labels:
    <key1>: <value1>
    <key2>: <value2>
           :
           :
    <keyN>: <valueN>
spec:
  containers:
    - name: <container_name>
      image: <image>
      volumeMounts:
      - name: <volume_name>
        mountPath: <mount_path>
  volumes:
    - name: <volume_name>
      secret:
        secretName: <secret_name>
Network Policies
Ingress and Egress Traffic
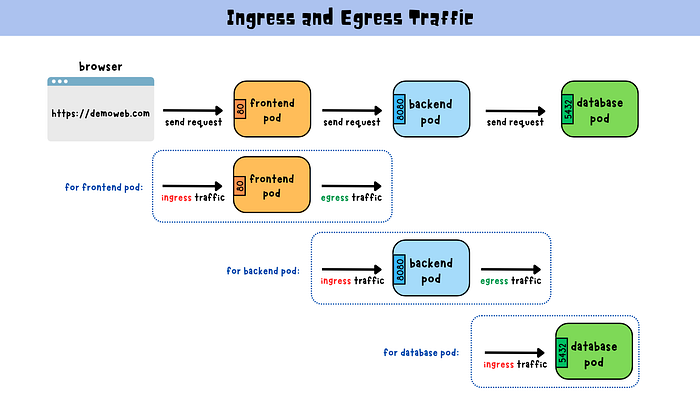
ingress and egress traffic
Ingress traffic refers to the incoming network traffic that is directed to a pod or a group of pods in the Kubernetes cluster. For example, if a user outside the cluster sends a request to a pod within the cluster, the traffic would be considered ingress traffic to that pod.
Egress traffic, on the other hand, refers to the outgoing network traffic from a pod or a group of pods in the Kubernetes cluster. For example, if a pod in the cluster sends a request to a service or an external endpoint outside the cluster, the traffic would be considered egress traffic from that pod.
Network Policies
By default, Kubernetes clusters allow unrestricted communication between pods and external access, which can pose security risks, especially in multi-tenant environments where multiple applications and teams coexist.
NetworkPolicy is a Kubernetes object that allows you to create policies that define how pods can communicate with each other and with external entities within a specific namespace. NetworkPolicy rules can be based on various factors such as IP addresses, ports, protocols, and labels, enabling you to restrict traffic to specific pods or groups of pods based on your security requirements.
Short Name: netpol
$ kubectl api-resources
NAME             SHORTNAMES   APIVERSION            NAMESPACED  KIND
networkpolicies  netpol       networking.k8s.io/v1  true        NetworkPolicy
NetworkPolicy with YAML
podSelector
The podSelector field selects pods based on their labels and determines which pods the policy applies to.
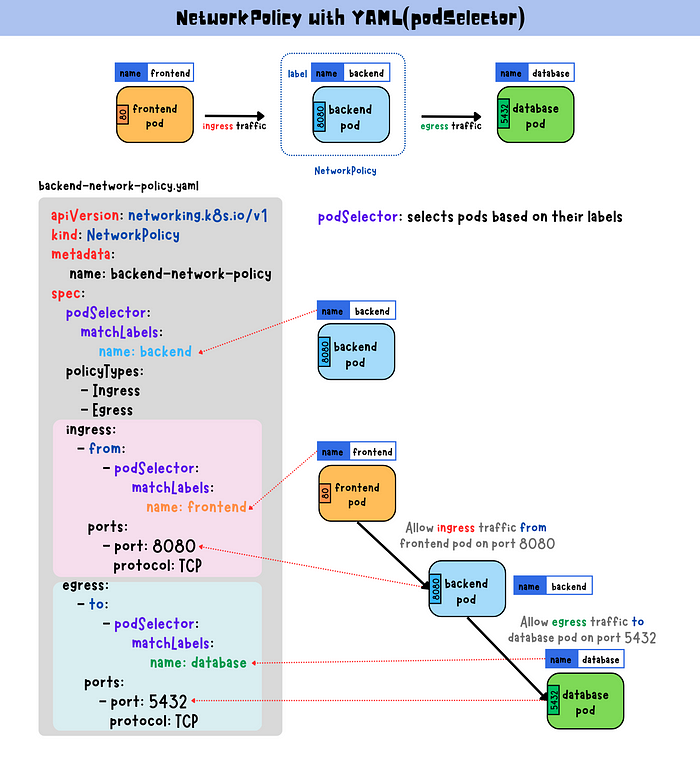
podSelector
apiVersion: networking.k8s.io/v1
kind: NetworkPolicy
metadata:
  name: backend-network-policy
spec:
  podSelector:
    matchLabels:
      name: backend
  policyTypes:
    - Ingress
    - Egress
  ingress:
    - from:
        - podSelector:
            matchLabels:
            name: frontend
      ports:
        - port: 8080
          protocol: TCP
  egress:
    - to:
        - podSelector:
            matchLabels:
            name: database
      ports:
        - port: 5432
          protocol: TCP
In this case, this NetworkPolicy targets pods labeled with name: backend. The ingress section defines incoming traffic rules from name: frontend pods on port 8080. The egress section defines outgoing traffic rules to name: database pods on port 5432.
namespaceSelector
namespaceSelector is a field that allows you to select particular namespaces and apply network policy rules to all the pods within those namespaces.
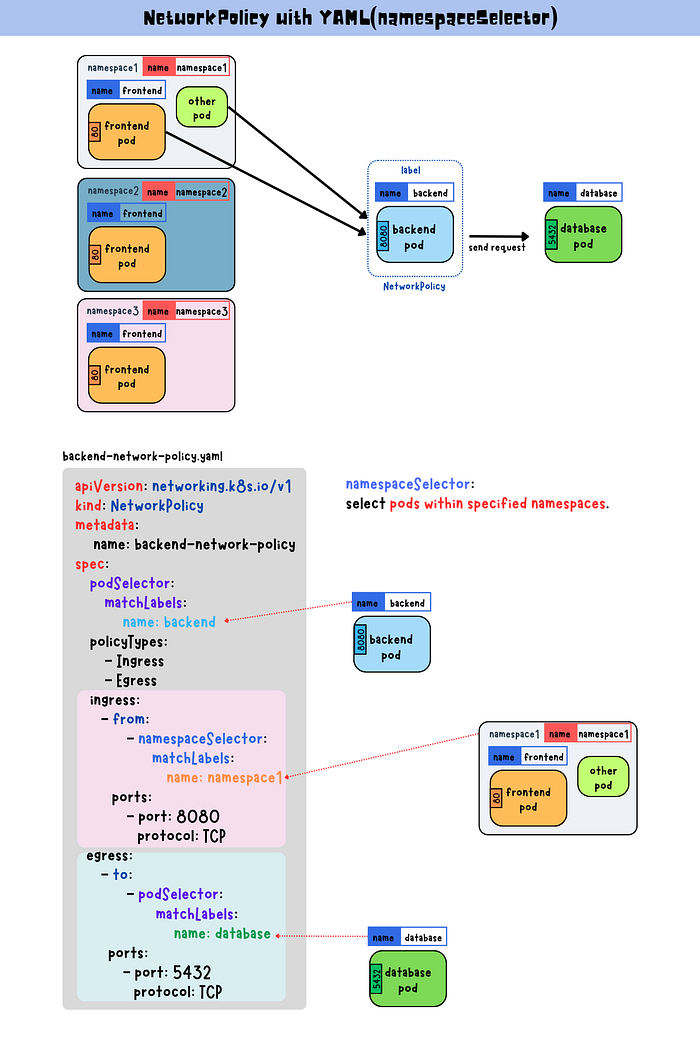
namespaceSelector
...
ingress:
  - from:
      - namespaceSelector:
          matchLabels:
          name: namespace1
    ports:
      - port: 8080
        protocol: TCP
...
In this case, it allows traffic from the pods in namespace1.
ipBlock
ipBlock is a field used to specify IP address blocks that are allowed to access or denied access to the pod. It can be used to define a CIDR block or a single IP address.

ipBlock
...
ingress:
  - from:
      - ipBlock:
          cidr: 192.168.0.0/16
    ports:
      - port: 8080
        protocol: TCP
...
In this example, the ipBlock field is used to specify the CIDR block 192.168.0.0/16. The ingress section allows incoming traffic to the pod on port 8080 using the TCP protocol only if the source IP address is within this CIDR block.
Transport Layer Security (TLS)
TLS Certificates
TLS certificates are utilized in Kubernetes to secure communication between various components within a Kubernetes cluster. Each component has its own digital certificate issued by a trusted third-party organization known as a Certificate Authority (CA). These certificates enable components to authenticate their identities when communicating with one another, ensuring that only authorized entities can access sensitive data or services.
To verify the identity of other components, each component needs to have a copy of the CA’s public certificate. This public certificate is used to verify that the digital certificate presented by the other component is valid and was issued by the same trusted CA. This ensures that the communication between components is secure and that sensitive data or services are protected.
Client Certificates
A client certificate is used to identify a client or user who is accessing a Kubernetes cluster or its components.
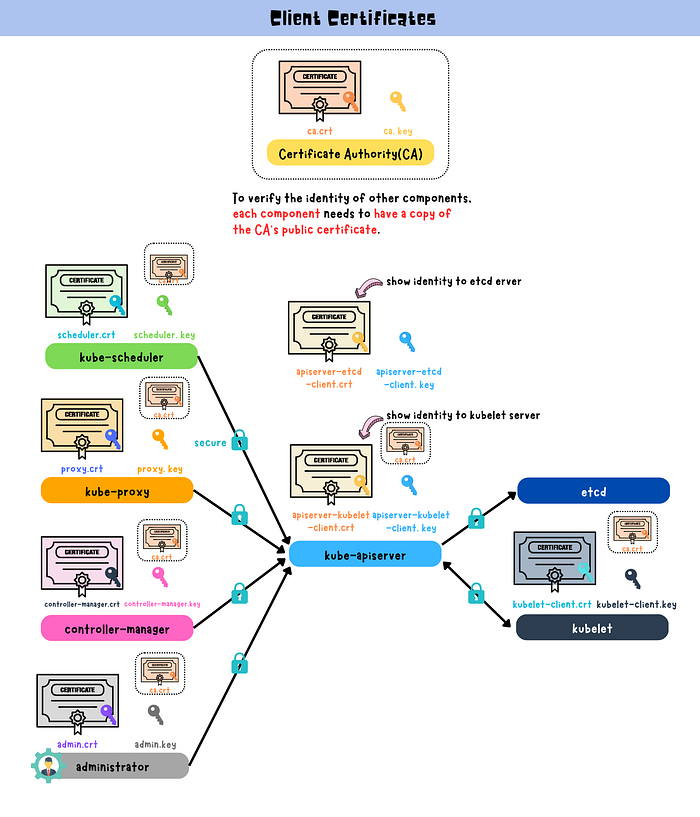
Client certificates
Server Certificates
A server certificate is used to identify a Kubernetes component, such as the API server, etcd, or kubelet.
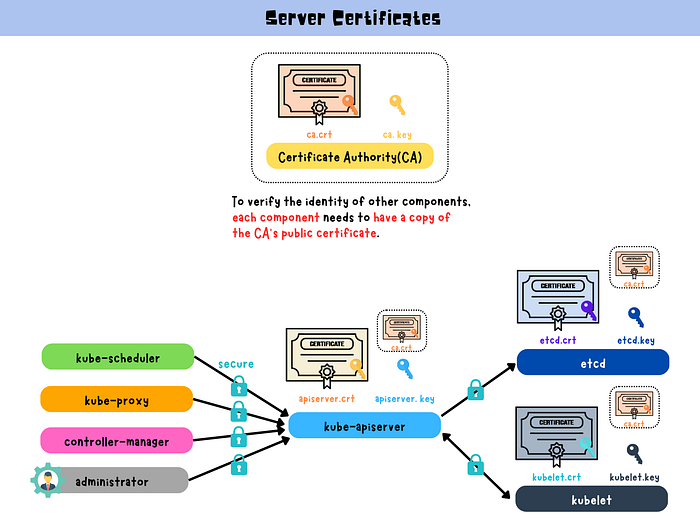
Generating TLS Certificates: Use OpenSSL to create a certificate:
openssl req -x509 -nodes -days 365 -newkey rsa:2048 -keyout tls.key -out tls.crt -subj "/CN=my-app/O=my-org"
Creating a TLS Secret:
kubectl create secret tls my-tls-secret --cert=tls.crt --key=tls.key
Using TLS in Ingress:
apiVersion: networking.k8s.io/v1
kind: Ingress
metadata:
  name: tls-ingress
spec:
  tls:
  - hosts:
    - my-app.example.com
    secretName: my-tls-secret
  rules:
  - host: my-app.example.com
    http:
      paths:
      - path: /
        pathType: Prefix
        backend:
          service:
            name: my-service
            port:
              number: 80
Deploy the Ingress with:
kubectl apply -f ingress.yml
This Ingress routes traffic to my-service and secures it using TLS.

